Pages - Menu


Showing posts with label Tutorials. Show all posts

Tuesday 27 November 2012

Apply a Vintage Effect to Several Images Using Actions


Have you ever wanted to apply the same effect to several images at once? This is an issue that most designers face at some point in their career. In some situations, you might be able to apply an effect individually one photo at a time. That takes time however, and if you have dozens or even hundreds of images to process, that is simply not possible. The solution is to create an action and apply it using a batch process. In today’s quick tip tutorial we will demonstrate how to create an action and apply it to several images using Photoshop’s batch process function.

Step 1

In my particular case , I decided to apply a vintage effect to all the photos in a folder on my machine. So the first step is to open a folder with all the photos you want to apply an effect to.

Step 2

Next, choose a random photograph and open it in Photoshop.
To apply the same effect to all the photos you will need to create an action. Go to the actions panel and press the New Action button. Name it Action 1.
Press record.

Step 3

In this step I will detail all the steps I took to apply a vintage effect to my images but you should feel free to apply any effects that you see fit, depending on your project. Keep in mind that you are recording so every step you take from this moment on will be recorded until you press the Stop button.
Apply an Adjustment Layer > Hue/Saturation.
Go to Filter > Blur > Gaussian Blur: 4 px. Layer Blending Mode: Soft Light. Opacity: 70%.
Go to Image > Adjustments > Variations (2 clicks on more cyan ). Blending mode: Overlay. Opacity: 80%.
Go to Filter > Other > High pass: 3 px. Layer Blending Mode: Soft Light.
Go to Adjustment Layer > Gradient Map. Opacity: 60%.
Go to Adjustment Layer > Photo Filter: 15%.
Now let’s save our work as a JPEG. This is very important because it needs to be recorded as an action. Name it as Copy as shown below.
Next, close the document. When prompted to save the changes in a PSD, select No. This is necessary because otherwise Photoshop will ask you the same question for all your photos.

Step 4

Now the action is ready. Press the Stop button.

Step 5

Go to File > Automate > Batch. Select Action 1, go to Source and select the folder in which your photos are located. Check Suppress File Open Options Dialog and press Ok.

Step 6

Sit back and watch as Photoshop does all the work for.

Conclusion

That’s it! We’re finished! Hope you learned something new!

How to Create an Abstract Wireframe Text Effect


Step 1

Let’s start by creating a new document which is 900 px wide and and 600 px high at a resolution of 300 pixels/inch. Make sure the Color Mode is set to RGB.

Step 2

Fill the “Background” layer with Black. Get the Type Tool and type your text. I wrote “ABSENT”. I used Futura Md BT font, set Font Style to Medium and Font Size to 220 px. I also set the Tracking to 20 to increase the space between letters. Make sure the Text Color is set to White.

Step 3

While the text layer is selected on the Layers Palette, hit Command/Ctrl + E to merge the text and the "Background" layers.

Step 4

Now go to Filter > Distort > Wave and use these settings: Type: Square, Number of Generators: 1, Max Wavelength: 635, Min. Wavelength: 257, Max. Amplitude: 141, Min. Amplitude: 62, Horiz. Scale: 24% and Vert. Scale: 22%. Now you’ll have a pretty distorted text. Please keep in mind that the result depends on these parameters as well as the size, tracking and position of the text.

Step 5

We’ll add another displacement effect to our text and we’re going to use Fragment filter for that. Go to Filter > Pixelate > Fragment.

Step 6

Now go to Filter > Stylize > Glowing Edges, set Edge Width to 1, Edge Brightness to 6 and Smoothness to 1.

Step 7

We’re going to copy this image to a new alpha channel and make a selection out of it. First hit Command/Ctrl + A to select the whole layer, hit Command/Ctrl + C to copy. Then go to the Channels Panel create a new channel and hit Command/Ctrl + V to paste. Command/Ctrl-click on the Alpha 1 channel thumbnail to get the white pixels selected.

Step 8

Now go back to the Layers Panel. Create a new layer and name it "Text". Fill the selection with White, hit Command/Ctrl + D to deselect. Go to the "Background" layer and fill it with Black. Now we’ll apply a Layer Style to "Text" layer. Select the "Text" layer in the Layers Panel and apply a Gradient Overlay using these settings: Blend Mode set to Normal, Opacity set to 15%, Gradient set to Blue, Red, Yellow, Angle set to 140 and Scale at 150%. Select the “Background” layer in the Layers Panel and create a new layer. Select both “Layer 1″ and “Text” layers, hit Command/Ctrl + E to merge selected layers. Now the layer style we’ve just applied is merged with the layer.

Step 9

It is time to add some lighting effects now. Duplicate the “Text” layer by hitting Command/Ctrl + J. Go to Filter > Blur > Gaussian Blur and apply with a Radius of 4 pixels. Hit Command/Ctrl + J again to duplicate the “Text copy” layer. Set Blend Mode to Overlay and hit Command/Ctrl + J once again to duplicate the “Text copy 2″ layer.

Step 10

Select “Text copy” layer in the Layers Panel and duplicate it. Drag the “Text copy 4″ layer just above the “Background” layer. Go to Filter > Blur > Gaussian Blur and apply with a Radius of 6 pixels. Then go to Image > Adjustments > Hue/Saturation and use these settings: Colorize: Checked, Hue: 315, Saturation: 38 and Lightness: -30.

Step 11

Now we’ll create the background. Create a new layer above the “Background” layer and name it “Lights”. Get the Gradient Tool, pick Foreground to Transparent and set to Radial Graident. Zoom out and apply gradients starting from outside the canvas as shown in the below image. You can use the colors shown below as well as you can pick your own.

Step 12

Create a new layer above the “Lights” layer and name it "Circles". Get the Brush Tool, pick one of the standart round brushes and open the Brushes Panel and change the settings as shown below.

Step 13

Set Foreground Color to #3fc5c6 and Background Color to #ad4cb1. Paint the "Circles" layer with random brush moves.

Step 14

Now go to Filter > Blur > Surface Blur, set Radius to 25 pixels, set Threshold to 175 levels and apply. Then go to Filter > Blur > Gaussian Blur and apply with a Radius of 4 pixels.

Step 15

Set the Opacity of the “Circles” layer to 15 and this is what we have so far.

Step 16

Finally, we’ll add some text to our design. I placed a clear "ABSENT" text and a subhead text using the same font we’ve used before.

Final Image

Here is the final image. I hope you liked this tutorial and the techniques you learned will come in handy for your own designs.

Further Suggestions

You can try combining multiple text in one design, or experiment different fonts, dingbats and layer styles and get great results.

Create a “Transfarmers” Text Effect Using Layer Styles in Photoshop


Tutorial Assets

The following assets were used during the production of this tutorial.

Step 1

Make a new .PSD document, 1000 x 500 pixels, RGB color, 100 dpi and grey background (color #33333). Create a new layer and fill it with brushed metal pattern from tutorial assets section (any metal texture will do though). Now using the Blending Options, fill this layer with a Light Blue color and set the blending options to “Overlay”. Finally if you want you can add a gradient that include several white and grey tones, with a bright area in order to create a better effect for the background.

Step 2

Now create the text using this font: Transformers Solid. Use these settings: 70 pt – Anti-Alias: Sharp. Now rename this text: “3D”. Then go in the menu Layer > Layer Styles > Blending Options and use these settings:

Step 3

Duplicate the text and rename it “Base”. Right click on his layer and click to “Clear Layer Style” or in the Styles Palette click on the first style “Default style (None)” (It’s the same thing). Now move this text slightly to the right in order to create a “pseudo 3D effect” with the text below (Look the Step image). Then go in the menu Layer > Layer Style > Blending Options and use these settings:

Step 4

Duplicate the text “Base”. Right click on his layer and click to “Clear Layer Style”. In the Blending Options menu on the right set the fill to 0%. Now and use these settings in the menu Layer > Layer Style > Blending Options:

Step 5

Your text effect is almost completed. Now we have to create a text reflection. Insert all 3 levels of the text effect in a group. Duplicate this group. Right click on it and click to “Convert To Smart Object”. Right click on it again and click to “Rasterize Layer”. Then go in menu Edit > Transform > Flip Vertical. Now move it as the image shown and then with the Eraser Tool delete as long as you want in order to create a realistic reflection. Finally to make the text effect nicer I added some sparks with simple brushes and color lights with soft brushes.

Conclusion

Now your text effect is completed!

Quick Tip: Create a Wet Plate Photo Effect in Photoshop


Tutorial Assets

The following assets were used during the production of this tutorial.

Wet Plate History

Collodion wet plate photography is an extensive process where a glass plate is prepared with several chemical solutions, transferred to a camera to expose, and then developed quickly all before it dries. This technique was used in the early 19th century to produce exquisite black and white photos with incredible detail.

Research

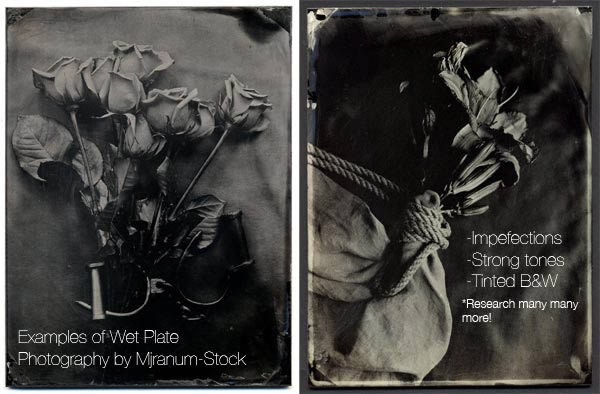
Wet plate photos vary in composition and detail according to the photographer’s preferences and its overall exposure time. Because each photo is unique, it’s important to treat each photo individually by applying only the attributes of the technique in Photoshop. Study the history, process, as well as dozens of examples before attempting digitally to avoid copying the effect of just one photo reference.

Attributes of Wet Plate Photos

Here are some characteristics of wet plate photography to keep in mind:
  • Wet plates are generally gray scale (no pure whites).
  • Chemicals may produce tinted photo with red, yellow, or blue undertones.
  • Streaks where the chemicals drip off are common.
  • The imperfections in each photo caused by debris, scratches, and changes in chemical reaction are what make them unique.

Step 1

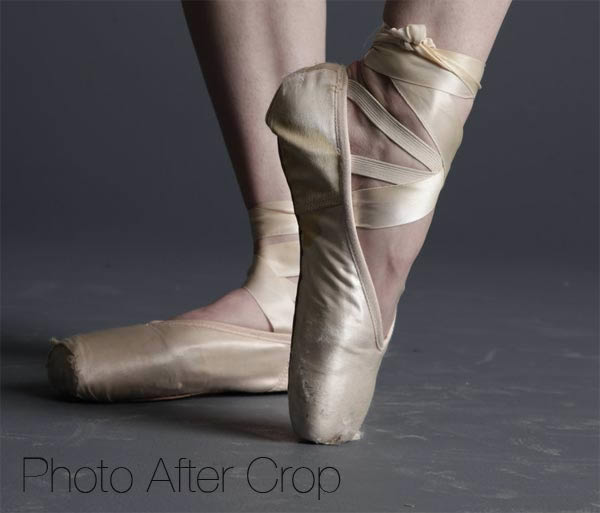
Open the stock photo of the ballet shoes in Photoshop. Since the collodion technique is often used to produce haunting photos I chose this stock because I thought it would be great for creating a similar mood. Think about a possible story behind your photo, and how it will affect the overall composition as you work on it. Feel free to add notes beforehand to remind yourself which qualities of wet plate will work best for your particular reference.

Step 2

Let’s focus more on the tension and elegance of the ballet shoes by cropping the photo. Grab the crop tool and crop it so that there is roughly an equal amount of space from the top of the shoe to the bottom. Never be afraid to crop or alter a stock photo to better suit the desired composition.

Step 3

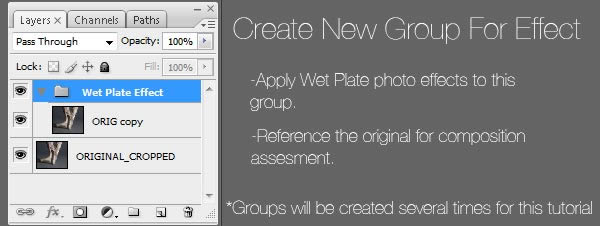
I always like to keep a copy of the original to flip back to every now and then. Duplicate the original photo, place it into a group, and name the group” Wet Plate Effect.” This will be the new group where the effects take place.
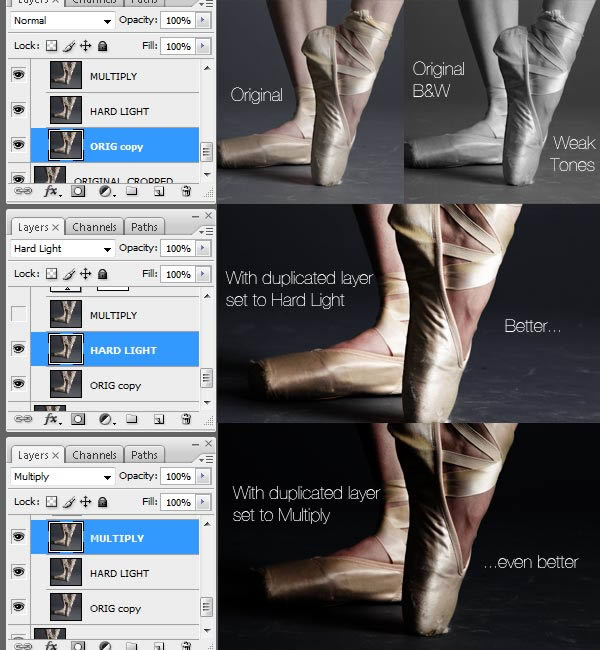
Step 4

Under the new group, right-click the copy of the original layer and duplicate it twice. Keep the bottom layer normal while you set the second layer to Hard Light, and the top layer to Multiply. The original photo is too light to work in grayscale just yet, so we want to make the tones of the photo richer before applying the black and white effect.
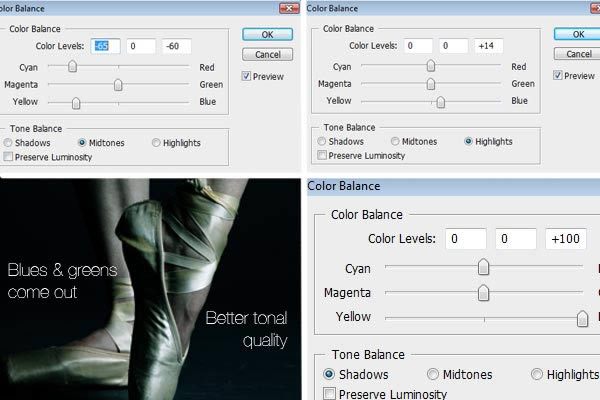
Step 5

Changing the color balance also helps us get more of the tonal quality we want. Go to Layer > New Adjustment Layer > Color balance and add the following properties to the Midtones, Shadows, and Highlights options. The colors are saturated in blues for now, but this option will help us later by improving tonal value.
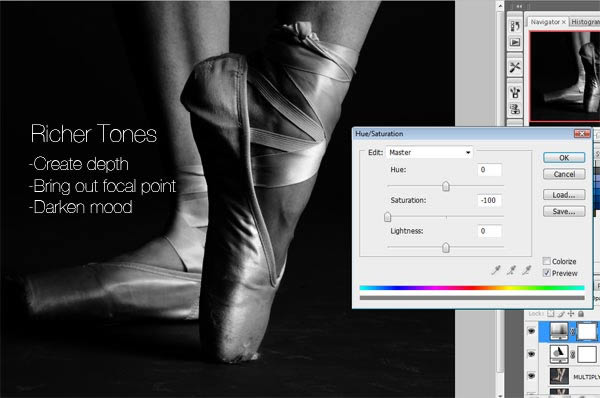
Step 6

Now it’s time to work in grayscale. Add a new adjustment layer for Hue/Saturation and bring the saturation down to -100.
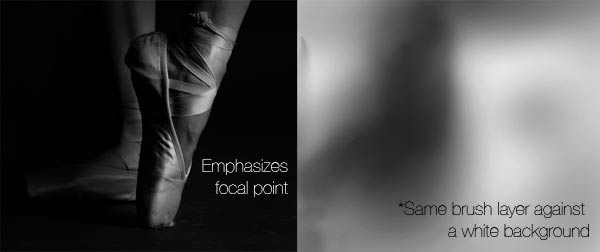
Step 7

Add a new layer above the Hue/Saturation layer. Using a low opacity, large round brush with a hardness of 0%, apply soft black shadows to the scene to emphasize the front foot. This also creates a softer transition of tones between the feet. Adjust the layer opacity by bringing it down to 92%.

Step 8

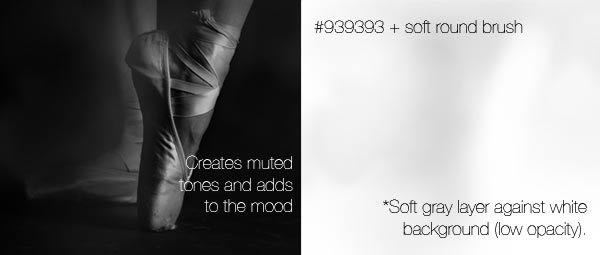
Add a new transparent layer. Using the same brush settings, select the color #939393 and build soft strokes of gray to the back foot and leg. Bring the opacity of the layer down to 50%. This technique in combination with the previous step will help to create the soft muted tones often associated with wet plate photography. Feel free to either use the Eraser Tool (E) or the layer opacity to create the desired effect for both layers.

Step 9

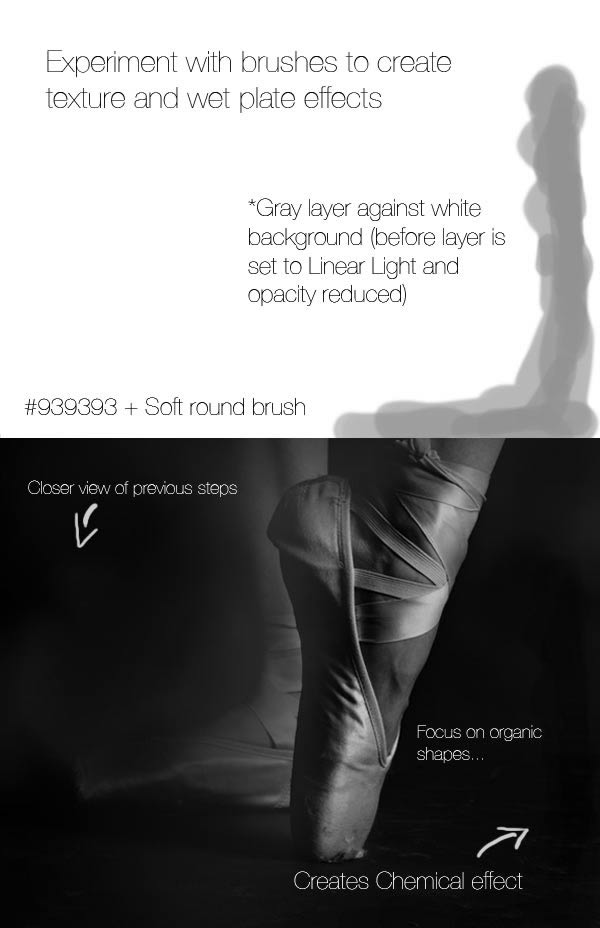
Add a new transparent layer. This will be used in experimenting with the smudges caused by the collodion chemical reaction. Using the same gray color (#939393) as before, apply the color to the lower right corner using a round brush with a 70px diameter, 75% hardness, and 60% opacity. Consider this the start of experimentation with the border of your “wet plate” photo. By setting the layer to Linear Light and lowering the opacity to 84%, we’ve created a soft “wet” look.

Step 10

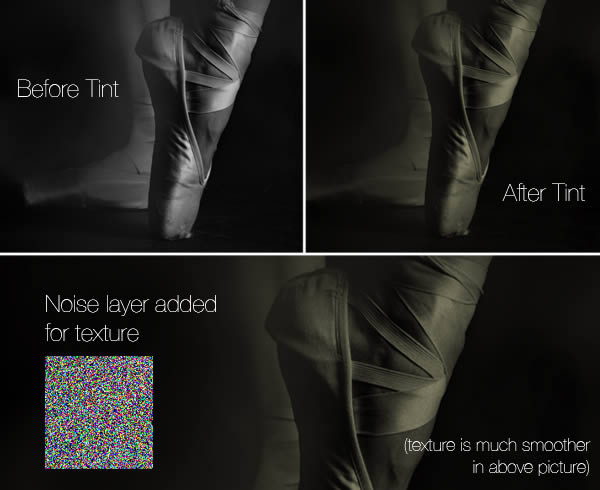
Not all wet plates are black and white. Sometimes the chemicals create red, blue, or yellow undertones. For this tinted effect, add a new layer and fill it with the color #938e5a. Bring the opacity of the layer down to 70% and set it to Multiply. Now let’s add some texture to the photo. Create another layer and fill it with the same gray color used previously. Go to Filter > Noise > Add Noise and add an amount of 200% to the layer. Drag the Noise layer underneath the Hue/Saturation adjustment layer so that the color doesn’t show through. Set the layer to darken and bring down the opacity to 18%.

Step 11

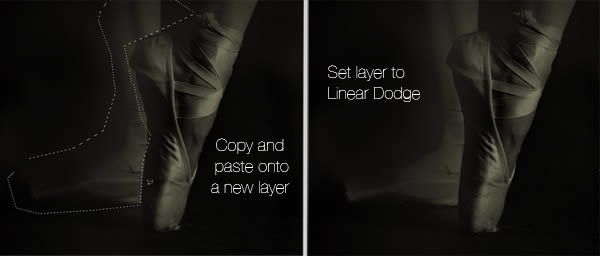
Now let’s work on the contrast between the front and back shoe. Select the “Original copy” layer and use the Polygonal Lasso Tool (L) to trace around the entire back leg. Copy and paste the leg onto a new layer and set it to Linear Dodge. This effect makes the back leg look a little overexposed while the front leg retains its clarity.
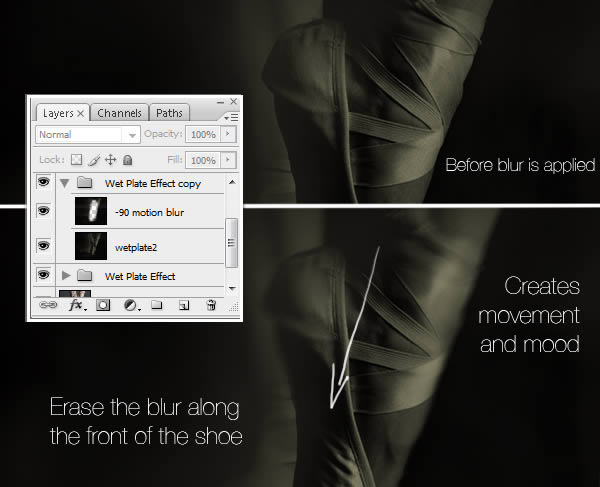
Step 12

Right-click the “Wet Plate Effect” group and duplicate it. Now in the “Wet Plate Effect copy” group, select all the layers and merge them together. Rename the merged layer to “wetplate2.” In wet plate photography there is often a blur that moves outward from the focal point. In this case the front ballet shoe is our focal point. So right-click the “wetplate2” layer and duplicate it. Go to Filter > Blur > Motion Blur and set the angle to -90 degrees and the distance to 16 pixels. Using a large, high opacity eraser brush with a hardness of 0%, erase along the side of the ballet shoe where the bands and skin meet. This allows the layer underneath to show through to retain enough detail.

Step 13

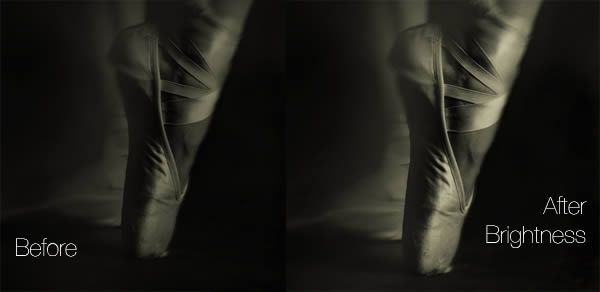
Add a new adjustment layer for Brightness and Contrast. Set the Brightness to +91. Use a large, soft eraser brush and erase over the two large pockets of shadow on either side of the front shoe.

Step 14

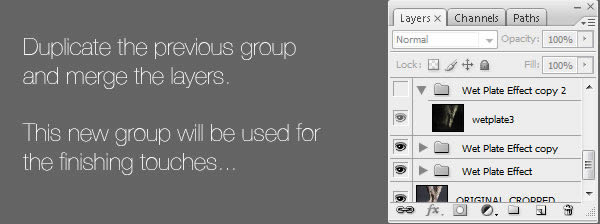
Select the “Wet Plate Effect copy” group and right-click to duplicate. Just as before, select all the layers now in the “Wet Plate Effect copy 2” group and merge them together. Rename the merged layer “wetplate3.” This group will be used for the finishing touches to the photo.

Step 15

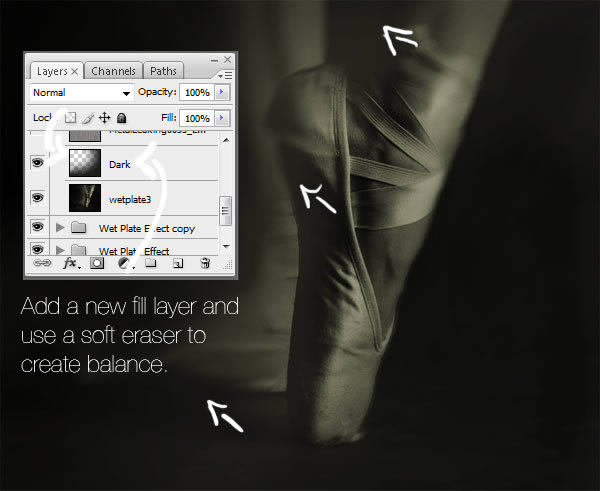
As we finish the photo we’ll continue tweaking the composition to fit the mood. Currently there is too much rich shadow to the right of the focal point. Add a new layer above “wetplate3” and fill it with the color #1d1d16. Bring the layer opacity down to 35% and use a large soft eraser brush to erase towards the left of the front ballet shoe.
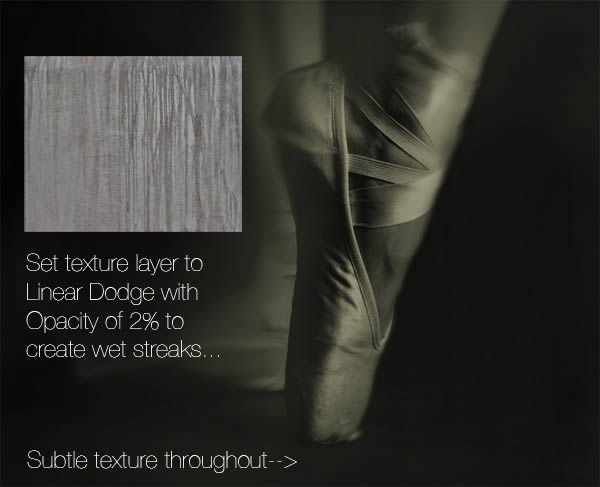
Step 16

As mentioned before, one of the characteristics of wet plate photography is the streaks from where the chemicals run off. To achieve this look, paste the “MetalLeaking0033” texture from CG Textures onto a new layer. Use the Free Transform tool to adjust the texture so that the leaking effect stretches across the canvas. To achieve a subtle effect, set the layer to Linear Dodge and bring down the opacity to 2%.
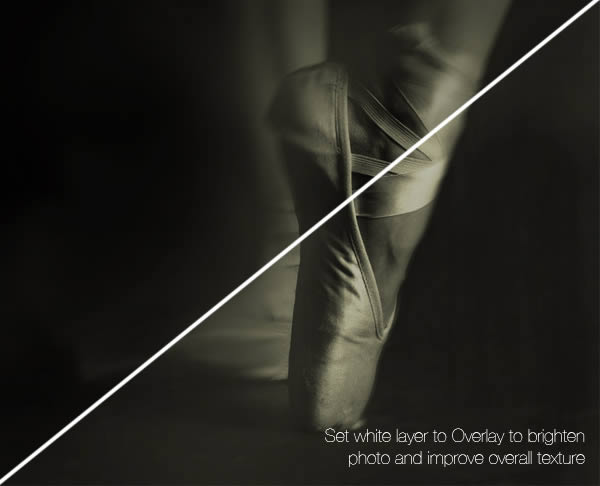
Step 17

Since the overall composition is a little on the dark side, add a new layer above the texture and fill it with white. Set the layer to Overlay and bring down the opacity to 30% to brighten the photo. Notice how the mood is dramatically different from our first steps.
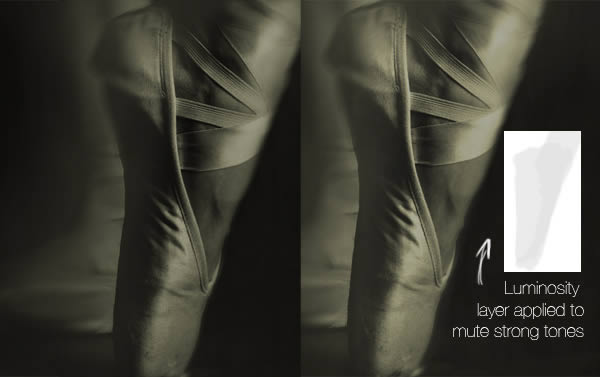
Step 18

These last steps will add character to our piece. Though the front ballet shoe stands out well, the tone is just a tad off from where it needs to be. Add a new layer and use a soft round brush to apply a gray color to the shoe. Set the layer to Luminosity and bring down the layer opacity to 18%.
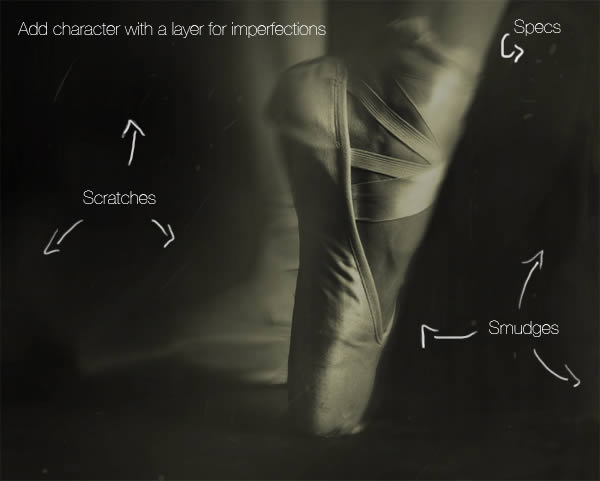
Step 19

The imperfections during the exposure and developing process are what make each wet plate photo unique. Set the foreground color to #f4f4c9. Take a hard round brush and set it to Pen Pressure for use with your tablet. Begin building organic, low opacity shapes, by swiping the brush across the screen. Create specs and scratches by varying your pen pressure. Utilize the Eraser Tool (E) to soften or omit shapes as you see fit. Experiment until you find what works. After, bring the layer opacity down to 14%.
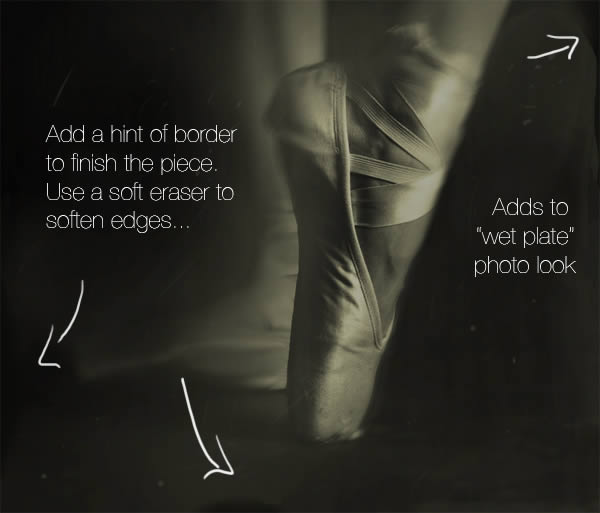
Step 20

To finish this effect, let’s add a hint of a border. Add a new layer and use the same brush settings to apply black strokes along the left, right, and bottom edges of the photo. Use a soft eraser brush to soften the edges for a smooth transition.

Conclusion

You can now create your own timeless photo without all the mess or smelly chemicals. Allow yourself room for experimentation and the time to study the true characteristics of this historic technique.